Start Walking Backward: 3 Benefits You Are Missing Out On
Walking backward is all the rage right now. I guarantee you can walk into a gym and see someone walking backward on a treadmill or performing backward sled pulls.
So what gives?
Research shows that walking backward may improve balance, reduce knee strain, and strengthen the thigh muscles (1,2,3). A review of 21 studies found backward walking to be an effective tool for reducing knee pain and increasing balance and quadriceps strength in 2 to 4 weeks (1).
When you walk backward, your thigh muscles don't stretch as much as forward walking, putting less stress on the knee. This is favorable for someone who has knee pain or soreness. But I still recommend you do it, even if you have zero knee pain symptoms.
You will run into knee soreness at some point in your exercise career, so it is best to condition the knee ahead of time to reduce its symptoms. And you don't have to do it every day; performing it once a week will have lifelong benefits. Remember, an ounce of prevention is worth a pound of cure.
Here's How You Do It
1) Find a steep hill or set the incline of your treadmill between 10 to 15%
2) Set the speed between 1 to 2 mph
3) Perform 3 to 5 sets by 100 steps or 10 minutes
4) Perform 1 to 3 times per week in your warm-up or on cardio days
5) Increase your duration weekly
*this can be done on flat ground as well, but I have found it is not challenging enough for most people
Watch the video below to see where I do my backward walking.
Resistance Training Increases Fat Loss At The Cellular Level
Whenever someone wants to lose weight, they instantly increase their cardio output and reduce their weight lifting. But what if I told you that resistance training was the secret to fat loss.
Would you believe me?
Whenever someone wants to lose weight, they instantly increase their cardio output and reduce their weight lifting. But what if I told you that resistance training was the secret to fat loss.
Would you believe me?
Resistance Training Increases Fat Loss
A new study has shown training with moderate to heavy loads increases fat loss at the cellular level. (1)
“The study results in mice and humans show that in response to mechanical loading, muscle cells release particles called extracellular vesicles that give fat cells instructions to enter fat-burning mode.” - Vechittie et. al 2021
But how heavy do you need to lift?
Participants performed four sets of their 7 rep max on the leg press and leg extension machine with two minute rest breaks.
A seven rep max would equate to about 80 percent of your one-rep max. So if you can leg press 200 pounds once, you would perform 160 pounds for seven reps.
Even though the study only looked at a seven rep max, I believe you can obtain similar benefits with different exercise prescriptions. To elicit the same fat loss response, you need to cause a high amount of stress on the muscle. There are three ways you can accomplish this:
moderate to heavy weight
train to failure
perform a high number of sets and reps (also known as, volume)
As a trainer, I have learned that most people don’t enjoy training to failure, nor do they enjoy lifting heavy weights. So, in my opinion, the easiest way to trigger fat loss would be through high-volume training. However, performing four to six sets in a row can be boring and diminish one’s motivation to finish the workout. Thus, you have to find a way to turn the workout into a game so that you are competing against yourself.
Density Training
One of my favorite ways to do this is through a workout called density training. It is perfect for people who are competitive and short on time.
To do it effectively, pick two exercises that train opposing muscle groups (upper vs lower or press vs pull) and perform ten reps at each one before switching. Your goal is to perform as many rounds as possible in ten minutes. I recommend performing 1-4 of these density sets. If your goal is strictly fat loss, perform 3-4 pairs of density sets.
How Heavy Should I Go?
Choose a weight that you can do for 15 reps and stick with that weight throughout the whole workout. Once you can perform 6 rounds with the weight, increase it by 5 pounds for upper body moves and 10 pounds for lower-body moves.
Exercise Selection
For beginners, I highly recommend starting with exercise machines first to learn how to train intensely. Once you feel comfortable pushing yourself under load, you can choose more advanced exercises like deadlifts, squats, and bench presses. The hack squat/leg press and lat pulldown are a great place to start.
Example Workout
1a. Hack Squat
1b. Lat Pulldown
2a. Hex Bar Deadlift
2b. Low Incline DB Bench Pres
3a. Pushups
3b. Chest Supported Machine Row
Reference
Ivan J. Vechetti, Bailey D. Peck, Yuan Wen, R. Grace Walton, Taylor R. Valentino, Alexander P. Alimov, Cory M. Dungan, Douglas W. Van Pelt, Ferdinand Walden, Björn Alkner, Charlotte A. Peterson, John J. McCarthy. Mechanical overload‐induced muscle‐derived extracellular vesicles promote adipose tissue lipolysis. The FASEB Journal, 2021; 35 (6) DOI: 10.1096/fj.202100242R

Ditch The Foam Roller & Do This Instead
Foam rolling is a form of self-massage where the individual uses their body weight to compress a targeted muscle with the goal of improving the surrounding connective tissue. For example, to roll out the quadriceps, you would lay on top of the foam roller in a plank position
Key Points
Foam rolling doesn’t release “scar tissue”
Foam rolling increases flexibility and pain tolerance
A dynamic warm-up is more effective than foam rolling
What Is Foam Rolling?
Foam rolling is a form of self-massage where the individual uses their body weight to compress a targeted muscle with the goal of improving the surrounding connective tissue. For example, to roll out the quadriceps, you would lay on top of the foam roller in a plank position.
Lower Body Foam Rolling
What Is Fascia?
"Fascia is the biological fabric that holds us together, the connective tissue network...Understanding fascia is essential to the dance between stability and movement — crucial in high performance, central in recovery from injury and disability, and ever-present in our daily life from our embryological beginnings to the last breath we take." - Anatomy Trains
Generally speaking, the body is connected together through a web of connective tissue called fascia. You may not have realized it, but you have come across fascia before while cooking. The thin, glossy layer of tissue coating a chicken breast is the fascia! These bands of tissue surround every muscle fiber, organ, and bone in the body.
Stronger Than Steel
Fascia is quite a remarkable tissue. It may be thin, but it is stronger than steel and can withstand massive tensile forces(1). When you are a nerd like myself, you tend to find commonalities in things. For example, spider webs remind me of fascia. Do you remember the last time you walked into one? I'm sure it wasn't a pleasant experience, but you were still able to get through it injury-free. Now imagine the same situation, but instead of a spider web, a web comprised of fascia. You'd be running through the woods, and then all of a sudden...Smack!
All of our muscles are covered in this web of steel, attaching each muscle to its corresponding bone via fascia. The body is a massive web of connective tissue, without it, we would fall apart. In addition to this steel-like frame, the fascia has the ability to absorb and recoil energy from external forces. For example, when you run, tendons absorb force from the ground, store it for a split second, and then use it to propel you forward. Researchers figured out this mechanism by studying the movements of kangaroo and gazelle:
“Kangaroos can jump much farther than can be explained by the force of the contraction of their leg muscles...scientists discovered that a spring-like action is behind the unique ability: the so-called ‘catapult mechanism’. Here, the tendons and the fascia of the legs are tensioned like elastic rubber bands. The release of this stored energy is what makes the amazing jumps possible...Surprisingly, it has been found that the fasciae of humans have a similar kinetic storage capacity to that of kangaroos and gazelles (2).”
We are still in the early stages of research, but we know it plays a crucial role in injury prevention. Thus, it would be wise to keep it healthy for as long as possible.
Does foam rolling accomplish this?
I am sure you have heard the claims that it improves muscular performance, flexibility, and even recovery. But how much evidence is there to back these claims? Let’s find out.
The Science
A recent review of 21 studies from the journal, Frontiers in Physiology, looked at the effects of pre-rolling and post-rolling on flexibility, muscle performance, and recovery. The systematic review found foam rolling to result in a small improvement in sprint performance and flexibility, but had negligible effects on jump and strength performance. Post-workout foam rolling was found to improve recovery slightly by reducing muscle pain perception.
"Overall, it was determined that the effects of foam rolling on performance and recovery are rather minor and partly negligible, but can be relevant in some cases...When foam rolling is used as a recovery tool, participants experience slightly reduced decrements in sprint and strength performance and a small reduction in the severity of muscle pain (3).”
Foam Rolling Doesn’t “Release” Scar Tissue
No one is entirely sure how foam rolling works, but there are theories. According to the meta-analysis above, the benefits of foam rolling could be due to a combination of the following:
Altered tissue adhesion/stiffness
Pain reduction
Increased blood flow/ parasympathetic circulation
Placebo effect
Anecdotally speaking, I have felt the pain-reducing effects of foam rolling on myself and my clients. But I don't buy the idea that a foam roller can physically manipulate tissue stiffness and neither does science. In a study measuring the effects of foam rolling on fascia, the authors concluded:
"...very large forces, outside the normal physiologic range, are required to produce even 1% compression and 1% shear in fascia… (4)."
Remember, connective tissue is stronger than steel. I don’t believe a piece of dense foam s capable of producing a force this strong. So, if foam rolling isn’t changing the physical structure of connective tissue, how is it improving performance and flexibility?
Warm Up The Body...Literally.
"Alternative explanations for acute benefits in performance could be a potential warm-up and/or placebo effect(3).”
It is well documented that increases in body temperature improve muscular performance, power, and flexibility(5). Thus, I don’t believe the benefits are due to the breakdown of scar tissue. Rather, I think the benefits are due to a combination of:
Increased blood flow
Increased body temperature
Placebo effect
I am not saying foam rolling doesn’t work. The research above shows it improves flexibility, pain tolerance, and sprint performance(3). But, I believe we can obtain the same benefits with a well-structured warm-up in less time. And since time is of the essence for most, I prefer the more efficient choice.
Dynamic Warm-Up
Dynamic warm-ups are more efficient than foam rolling and the better choice. They have been shown to improve flexibility and muscular performance, whereas foam rolling’s effects on muscular performance appear negligible at best (3,5).
A lack of movement has been shown to damage fascia by reducing tissue elasticity(2). And since most people sit all day, a warm-up that increases movement and muscle performance is the better option. You don’t need foam rolling to improve the quality of your fascia, you just need to move more. But that doesn’t mean foam rollers don’t have uses. I have found them to be quite useful for training the glutes, hamstrings, and calves.
I love using one of the exercises below for a warm-up. Before performing any of the movements below, I recommend performing 3-5 minutes of cardio on a rower, bike, or elliptical. Once you finish your cardio, choose one of the exercises below. The exercises are ordered in difficulty from left to right, so beginners should start with the ISO Hip Bridge first and then move on once you can perform 3 sets by 60-second holds.
After completing one of the exercises above, perform one of the pushup variations below.
From there, choose one of the lower body exercises below to finish off your warm-up. Depending how much time you need or have, you can repeat the routine 1 to 3 times.

3 Exercises To Improve Your Arms & Abs
Over the last ten years as a trainer, I have done over 10,000 assessments with gym members. During that time, I have come to learn that most people want either nicer arms or abs. So I decided to throw together a circuit you can use to achieve that goal. I recommend using it at the end of your next upper body or cardio day.
Over the last ten years as a trainer, I have done over 10,000 assessments with gym members. During that time, I have come to learn that most people want either nicer arms or abs. So I decided to throw together a circuit you can use to achieve that goal. I recommend using it at the end of your next upper body or cardio day.
Use the double progression method for the following exercises on a cable machine. Choose a weight that allows you to perform 12 to 15 reps. Once you can perform 15 reps with that weight for 3 rounds, increase it by five pounds in the following workout and try to perform 12 to 15 reps. You will only increase the weight when you can achieve 15 reps for each round. Perform the exercises below in a circuit fashion.
Cable Arm Curl 12-15 reps
Cable Tricep Pushdown 12-15 reps
Cable Dead Bug 6-8 reps per leg
Rest 30 to 60s between exercises
Repeat 2-4 times
*if you don’t have access to a cable machine then a band can work too.
Beginners Should Ditch the Barbell Deadlift & Do These Instead
When I was in New Jersey last week working out in LA Fitness, I came across a boyfriend trying to teach his girlfriend the deadlift.
It made me cringe.
Her back looked like a turtle shell. I wanted to interject and correct her technique, but I knew that wouldn’t end well with the boyfriend there. So I kept to myself and finished my workout. But now, I feel obligated to write this post on proper deadlifting techniques.

Don’t be a turtle in your deadlift
When I was in New Jersey last week working out in LA Fitness, I came across a boyfriend trying to teach his girlfriend the deadlift.
It made me cringe.
Her back looked like a turtle shell. I wanted to interject and correct her technique, but I knew that wouldn’t end well with the boyfriend there. So I kept to myself and finished my workout. But now, I feel obligated to write this post on proper deadlifting techniques.
Beginners Should Ditch the Barbell
The deadlift is a hard exercise to learn, especially when starting with a straight barbell. Before teaching a loaded deadlift, I teach the hip hinge first. Once you can perform two sets by 20 reps move on to a loaded variation.
Hip Hinge Exercise Prescription
Fitness Level: beginner
Cue: pull your hips and keep your chest up
Muscles targeted: glutes, hamstrings, and back
Sets: 2-3
Reps: 20
Rest: 30 seconds
Tempo: 21X
lower slowly
pause one second
stand up quickly (push the ground away)
For beginners, I recommend using a kettlebell or dumbbell. I have found them to be some of the best tools to teach the deadlift. Plus, it teaches you how to use your hips properly so that you don’t injure your back when picking things up off the ground.
Yes, you read that correctly.
The deadlift helps prevent lower back pain.
“But Erik, every time I deadlift, my back hurts.”
It is common to feel a slight soreness in the lower back due to the muscles becoming fatigued, but it shouldn’t be painful. Instead, you should feel a slight stretch in the backside of the legs.
KB DL Exercise Prescription
Fitness Level: beginner to intermediate
Cue: pull your hips back and bend your knees
Muscles targeted: glutes, hamstrings, thighs, and back
Sets: 2-5
Reps: 10-20
Rest: 30-90 seconds
Tempo: X02
stand up quickly (push the ground away)
no pause
lower slowly
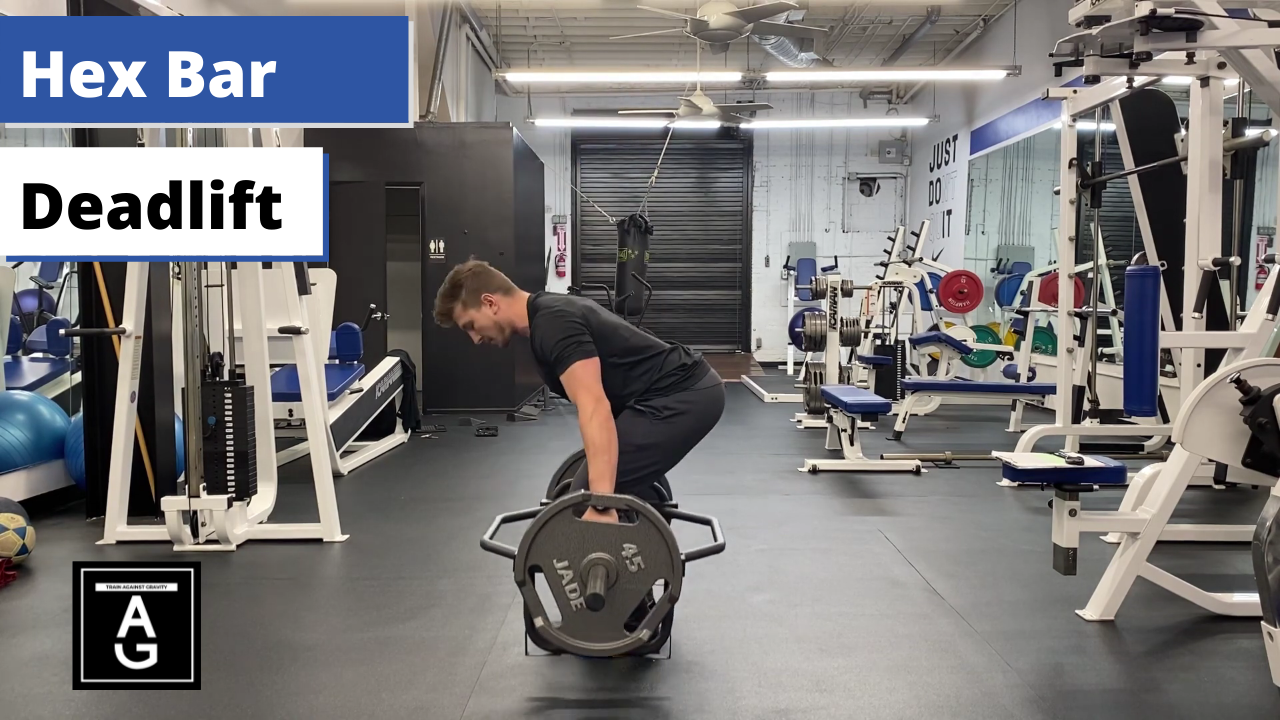
When done correctly, the deadlift is one of the best exercises for developing strength in the backside muscles of your body, especially the glutes and hamstrings. However, you need to load the movement adequately to challenge these muscle groups. So, once you feel comfortable with the kettlebell, substitute it out for the hex bar.
Hex Bar DL Exercise Prescription
Fitness Level: intermediate to advanced
Cue: pull your hips back and bend your knees
Muscles targeted: glutes, hamstrings, thighs, and back
Sets: 2-5
Reps: 3-15
Rest: 1-3 minutes
Tempo: X02
stand up quickly (push the ground away)
no pause
lower slowly
After you feel comfortable with the hex bar, I recommend progressing onward to the Romanian deadlift, also known as the RDL. The biggest difference between the RDL and a traditional deadlift is the “top-down approach.” Instead of starting from the floor, you will start the movement from a rack and lower the weight down to your knees or the middle of the shin. I have found the top-down approach to be very beneficial for targeting the glutes and the hamstrings. The range of motion will be dependent on your flexibility, but most should lower somewhere between the knee and shin.
the hex bar can be used for this exercise as well
RDL Exercise Prescription
Fitness Level: intermediate to advanced
Cue: pull your hips back and knees back
Muscles targeted: glutes, hamstrings, and back
Sets: 2-5
Reps: 6-15
Rest: 1-3 minutes
Tempo: 30X
lower slowly
no pause
stand up quickly (push the ground away)
Summary
Before wrapping up, I want to state that there are is no such thing as a bad exercise. It all depends on the execution. But I have found certain exercises to be harder to learn than others. The barbell deadlift is one of those exercises, but it doesn’t mean you shouldn’t perform it. Instead, you should use it when you feel ready and comfortable with the movement.